Most Visio shapes are pre-assigned to a drawing layer when they are pulled from a Visio stencil. Layers can be used to organize related shapes on a drawing page. A layer is a named category of shapes. By assigning shapes to different layers, you can selectively view, print, color, and lock different categories of shapes. Visio also provides the ability to select all shapes that belong to a layer.
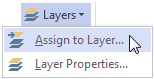
Select a shape on the drawing canvas and use the ‘Layers’ drop-down list in the Editing section of the Home tab and select ‘Assign to Layer…’. If working in Visio 2007, select a shape, access the Format menu, and select ‘Layer’.
In the Layer dialog, click ‘New’ to create a new layer.
Deselect any checkmarks in existing layers and make sure that there is a checkmark next to the new layer you’ve created; then, click OK.
Now the selected shape(s) is assigned to a new layer.
Layers can be very useful to hide annotation shapes and text boxes used to capture notes in a flowchart. These layers can be ‘turned off’ in the layer properties dialog by de-selecting the ‘visible’ option.
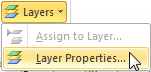
To access the layer properties in Visio 2010, visit the Editing section of the Home tab and select ‘Layer Properties’. In Visio 2007, access the View menu and select ‘Layer Properties’.
Visio 2013
Visio 2010
Visio 2007

ProcessView will only analyze shapes in visible layers. If annotations or notes are visible and you would like ProcessView to ignore them during analysis, the ‘DoNotIncludeLayers’ property in the Page Shape data can be used to accomplish this.
To access the Page Shape Data, simply click in the Drawing Canvas.
If shape data has not been assigned to the page, use the ProcessView Define Attributes button.
If working in ProcessView version 1, use the Add/Update Attributes button.


